


Reviews and corrects ledger-to-subledger alignment in D365 by fixing posting configurations, inventory profiles, reconciliation logic, GL mapping, and critical reporting procedures.
Register Customer Payments in Dynamics Business Central
Posted on: February 6, 2024 | By: Page Wildridge | Microsoft Dynamics Business Central
Hi Everyone, my name is Kevin Gallagher, and I am a financial consultant with Logan Consulting. Welcome to a brief tutorial on posting customer payments via Register customer payments in Business Central.
In today’s blog, I’m hoping to highlight a quick and easy way to post payments received from customers that many users may not know about. Instead of entering payment details like customer, amount, and invoices to be applied to. Register customer payments allows us to start with our open invoices and select what has been paid.
Benefits of Register Customer Payments
Some of the benefits of using Register customer payments versus Customer payment journals include:
- Less manual entry
- Less opportunity for errors
- Quick and easy processing
Using Register Customer Payments
With that said, let’s jump into Business Central to see this functionality in action.
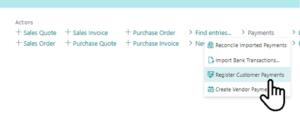
- Register customer payments can be found in the Actions section under Payments:
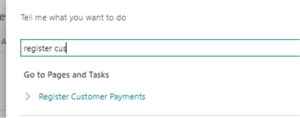
- It can also be accessed via a search and will be listed under Pages and Tasks:
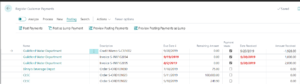
Register customer payments will show all customer invoices and credit memos with an open amount greater than $0.
Creating the payment(s)
To create a new payment, you simply need to select the Payment Made checkbox for each invoice to be applied to
- The Amount received and Date Received will automatically populate with today’s date and the full open amount of the invoice/credit memo
- If the payment was received prior to today, update the Date Received
- If the amount received was less than the full open amount, override the Amount Received
- In this screen, we can also apply credits taken to the payment
- For example, if a customer applied a credit memo against a payment, we can select Payment made like any other invoice. This will apply the credit memo against the payment along with the invoices paid.
Posting the payment
Once all invoices have been selected and Amount received has been updated. We can post the payments.
Before doing so, confirm the bank account listed in the Setup is the bank account we want to post to
- There is not a confirmation step prior to posting, you should be sure you are posting to the correct bank account beforehand.
- If necessary, we can also update the journal template and batch to post these customer payments.
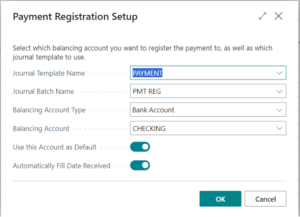
- Click on Process>Setup to access the default posting settings for Register Customer Payments:
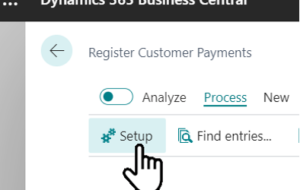
- Click on Process>Setup to access the default posting settings for Register Customer Payments:
- Journal Batch Name: Optionally update to segregate customer payment postings that came from Register Customer Payments.
- Balancing Account Type: Customer payments should always be posted to a Bank Account
- Balancing Account: Optionally update the bank account the payment should be posted to.
- This is only relevant if you receive customer payments into more than one bank account.
- If you have a single account, you can set the Use this Account as default = Yes and would never have to update this prior to posting.
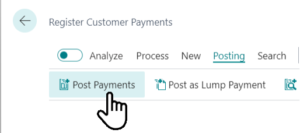
When posting, we have two options:
- The first is Post Payments: This will post a separate payment for each individual invoice selected.
- For example, if we are recording multiple payments for a given customer, and the customer paid for each invoice individually, we can use this option.
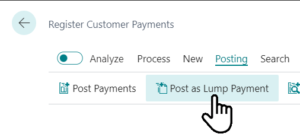
- The second and more likely scenario is Post As Lump Payment: This will combine all invoices/credit memos selected into a single payment.
- Use this option if you are applying a single payment to multiple invoices/credit memos.
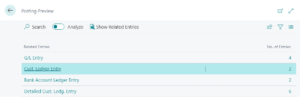
To see the posting impact, I’d suggest using the Preview posting options prior to actually posting.

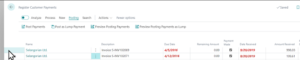
- Given the example shown above, where I have two invoices marked as paid for a customer, the posting differences between payments and lump payments would be as follows:
- Post Payments: Two payment records are created, one for each invoice selected.

-
- Post as Lump Payment: A single payment is created with an amount equal to the sum of the two invoices selected.
![]()
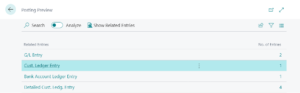
After posting, we can view the entries created by navigating to the customer record and clicking on Payments>Find Entries, which include:
- GL posting
- DR Bank Account
- CR Accounts Receivable
- DR Bank Account
- Bank Account ledger: Records bank account activity (increase in cash)
- Cust. Ledger Entry: Records the payment on the customer record and reduces open receivable balance.
- Detailed Cust. Ledger Entry: Displays invoices/credit memos applied to payment record.
Next Steps
Thank you for reading this blog post on using the Register Customer Payments functionality in Business Central. I hope you are able to make use of this quick and easy way to record customer payments in your organization!
If you have any questions or would like to learn more, please click on here to schedule time with our team. We hope to speak with you soon.


