


Reviews and corrects ledger-to-subledger alignment in D365 by fixing posting configurations, inventory profiles, reconciliation logic, GL mapping, and critical reporting procedures.
8 Steps for a Fixed Assets Migration to Acumatica
Posted on: November 16, 2023 | By: Page Wildridge | Acumatica
Data migration during cutover is a critical piece of any successful ERP implementation. It is crucial that cutover steps are performed in a proper sequence to maintain the accuracy of the migrated data and to ensure the data is ready to be transacted on for go-live. Migrating fixed assets can be particularly challenging since a mistake could skew the roll forward value and future calculated depreciation of a company’s assets.
Fortunately, Acumatica makes fixed asset migration simple with the following steps:
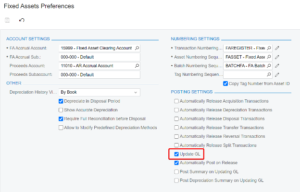
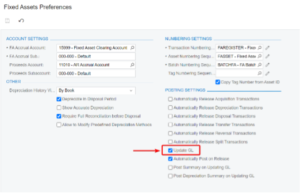
1. Navigate to the Fixed Assets Preferences (FA101000) and clear the Update GL check box to switch on initialization mode. Save your changes.
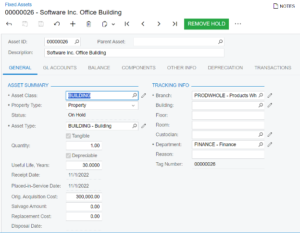
2. Create the fixed assets by either manually entering the records or loading them through an Import Scenario. Ensure you capture key fields including:
- Asset Class
- Property Type
- Asset Type
- Useful Life
- Receipt Date
- Placed in Service Date
- Original Acquisition Cost
- Department
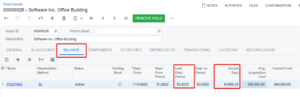
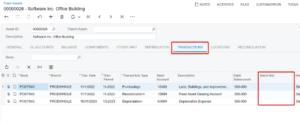
3. Within the Balance tab of the asset, define the Last Depreciation Period as the cutoff date for data conversion (last date depreciation was calculated before migrating to Acumatica). Define the Accumulated Depreciation as the accumulated depreciation through the cutoff date.
4. Save the fixed asset record. Automatic entries will appear within the Transactions tab of the asset record. The entries are to record the asset acquisition and to-date accumulated depreciation. Notice that the transactions are missing batch numbers. These transactions will not affect the general ledger if Update GL is turned off in Fixed Asset Preferences (FA101000).
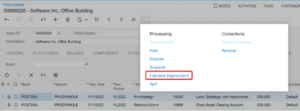
5. On the toolbar, click Actions > Calculate Depreciation. The system calculates the asset’s remaining depreciation based upon the depreciation method.
6. On the Depreciation tab of the asset, review the calculated depreciation. The Calculated column displays the calculated depreciation for the periods. The Depreciated column shows the recorded depreciation amounts. The accumulated depreciation which was entered in Step 3 is recorded in the last depreciation period.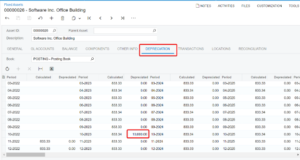
7. Run the FA Balance by GL Account (FA643000) report to validate the loaded balances for assets and accumulated depreciation.
8. Lastly, on Fixed Assets Preferences (FA101000), check the Update GL check box to turn off initialization mode. Save your changes.