


Reviews and corrects ledger-to-subledger alignment in D365 by fixing posting configurations, inventory profiles, reconciliation logic, GL mapping, and critical reporting procedures.
Streamline Your Business Processes With Personalized Workspaces in Microsoft Dynamics 365 Finance and Supply Chain Management
Posted on: October 23, 2023 | By: Jarrod Kraemer | Microsoft Dynamics AX/365, Microsoft Dynamics Manufacturing
In today’s fast paced business environment, efficiency is key. Microsoft Dynamics 365 Finance and Supply Chain Management (D365) understands this and has introduced a powerful feature to help users streamline their business processes – Personalized Workspaces. These workspaces can be personalized to individual roles and tasks, offering a customized and efficient way to interact with D365 modules.
As you may know, Workspaces are user centric dashboards within the D365 environment. Microsoft provides several preconfigured workspaces designed for specific needs of different roles within an organization. Instead of navigating through a cluttered interface with a numerous tabs and unwanted data, you can get a clean and organized workspace containing only the information and tools that you specifically need. Personalized workspaces give users the ability to create their own workspace and configure it with the information they need without any coding or technical knowledge required.
Personalized workspaces can be built based on configured Views throughout different module forms. In this blog, we will be walking through steps on how you can configure and utilize your own personalized workspace.
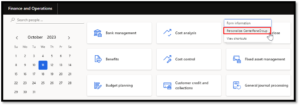
Step 1: From the D365 default dashboard, right click and select “Personalize”.
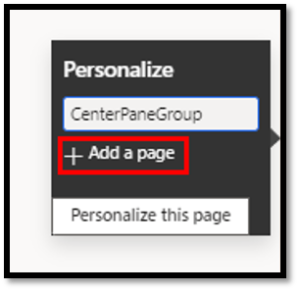
Step 2: From the Personalization box, select “Add a page”.
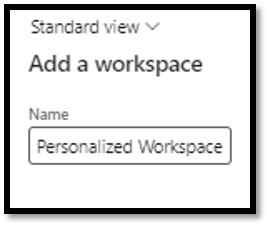
Step 3: Select “Workspace” and then enter a name for your workspace.

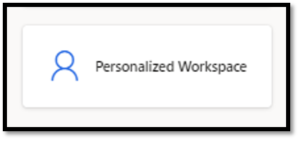
On your default dashboard you will now see a workspace tile for what you have just created. If you select the tile, you will not see any information on the form. That is because next we must personalize it by selecting which information forms we would like included in this workspace and how they should be configured.
Step 4: Navigate to a form that you would like to add to your workspace. Once you are at the form, select the “Options” tab on the action pane and then select “Add to workspace” under the Personalize section. The view configuration applied to the form when you select “Add to workspace” will be brought to your workspace. If you would like to bring filtered data into your workspace, you must first save it as a view.

Step 5: Select the workspace you would like to add this data to and then select the Presentation. Options for the presentation are for the data to be displayed in the form of a Tile, List, or Link. After making your selection, click “Configure”.

Step 6: The next steps will depend on your Presentation selection.
If Tile was selected, enter a display name for your tile, select if you would like your tile to include a number count or not, and select the size of the tile. Once completed, select “Add to workspace”.

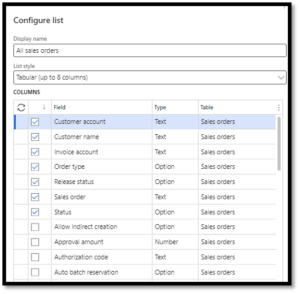
If List was selected, enter a display name for your list, select if you would like for your list style to be Simple (Up to 3 columns) or Tabular (Up to 8 columns) and make your column selections to be included in your workspace. Once completed, select “Add to workspace”.
If Link was selected, Enter a display name for your link. If you have multiple links in your workspace, you have the option to group them. If you would like to group your links, enter a group name. Once completed, select “Add to workspace”.

Step 7: Navigate back to the default dashboard and select your workspace tile to see your configurations.

Now you can repeat this process to add multiple tiles, lists, or links to streamline your business processes in your personalized workspace.
Next Steps:
If you want to learn more about how to configure Microsoft Dynamics 365 Finance and Supply Chain Management for user specific needs and streamline your business processes by utilizing personalized workspaces, contact us here to learn how we can help you grow your business. You can also email us at info@loganconsulting.com or call (312) 345-8817.


