


Reviews and corrects ledger-to-subledger alignment in D365 by fixing posting configurations, inventory profiles, reconciliation logic, GL mapping, and critical reporting procedures.
Creating Customer Profiles in QAD
Posted on: October 26, 2021 | By: David Kwo | QAD Financials, QAD Business Process
Establishing customer profiles is an essential prerequisite step in leveraging many helpful tools and functionalities within the QAD system. This blog will walk through the set-up of a customer record and other relevant fields.
Step 1: Use Customer Create to setup new customers within your QAD system. Create an 8-character customer code and business relation code (note that this cannot be changed later), enter a Bill-To Customer code (if another customer receives the bill for this customer), and indicate whether the record is active.

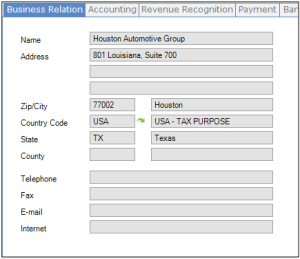
Step 2: In the Business Relation tab, enter basic address information for the customer record.
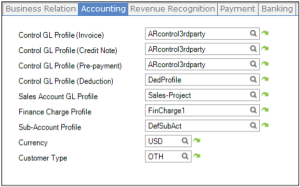
Step 3: In the Accounting tab, establish control accounts for Invoice, Credit Note, Pre-payment, and Deduction. Additionally, indicate the currency the customer uses and type of customer.
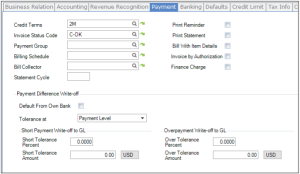
Step 4: Use the Payments tab to indicate your preferences on customer payments for the record. Among other fields, choose a payment group, statement cycle, and billing schedule for the customer.
Step 5: Set up the payment process for the specific customer In the Banking tab. To learn more about customer payments in QAD, read our blog here.

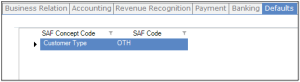
Step 6: Use the Defaults tab to specify SAF concept codes and SAF codes.
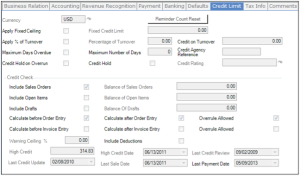
Step 7: Create credit limits for customers in the Credit Limit tab. Specify fixed credit limits and choose whether to apply fixed ceilings to the customer.
Step 8: Finally, use the Tax Info tab to specify the various tax codes the customer is subject to, as well as which tax zone it is in.

Next Steps
If you are interested in learning more about Customer Profiles in QAD and/or maximizing the use of your QAD system, contact us here to find out how we can help you grow your business. You can also email us at info@loganconsulting.com or call (312) 345-8810.


