Plan loads using hub consolidation with Dynamics 365 Supply Chain Management
Posted on: March 15, 2022 | By: Guy Logan | Microsoft Dynamics AX/365, Microsoft Dynamics Manufacturing
According to AAA, the national gas prices have reached an average of $4.33 which is the highest it’s ever been. With skyrocketing gas prices, it’s pretty obvious that strategic transportation management is necessary when planning out shipments. Consolidating shipments will help reduce some of the shipping costs. This blog describes how to use the feature for consolidating shipments in a hub with Microsoft Dynamics 365 Supply Chain Management when you deliver goods from different warehouses to the same customer, or when you receive goods from multiple vendors in the same warehouse. It can be useful to consolidate shipments in a hub when you deliver goods from different warehouses to the same customer, or when goods are delivered from multiple vendors to the same warehouse.

Building loads
Before you can use hub consolidation, you must enable the In-transit planning option on the Transportation management parameters page. You must also create the hubs where consolidation will occur. The following diagram shows an example of hub consolidation. In this case, sales orders from different warehouses are going to the same customer. The basic loads are created based on sales orders in the usual way, by using the Load planning workbench page. To consolidate the two loads in a hub before they are delivered to the customer, on the Load planning workbench page, in the Transportation field, select Hub consolidation. When you select the correct hub for each load, the loads will have the hub as the “drop off” destination. You will also have two “transportation request lines” in the Supply and Demand section on the Load planning workbench page. You can then add these two lines to a new load. This new load will have both sales order lines and will also have the hub as the “pick up” address and customer A as the “drop off” destination. The three loads are then ready to be rated and routed like any other load. You can select whatever shipping carrier the system suggests for each load. 
You can also use the same method to consolidate loads for multiple transfer orders. In this case, customer A in the preceding diagram is a warehouse. Alternatively, you can consolidate loads for multiple purchase orders, where the loads are delivered from different vendors to the same warehouse. You can have more than one consolidation hub and can consolidate in multiple hubs for more loads that come from different warehouses. After you build your basic loads and use the hub consolidation option, you build the new loads by using the consolidated transportation request lines. You then rate and route your loads.
Create a sales order
- Go to the Navigation pane > Modules > Accounts receivable > Orders > All sales orders.
- Select New.
- In the Customer account field, select the drop-down button to open the lookup.
- Select account US-004.
- Select OK.
- In the Item number field, select the drop-down button to open the lookup.
- Select item A0001. A0001 is enabled for transportation management.
- In the Site field, select the drop-down button to open the lookup, then select an item.
- In the Quantity field, enter a number.
- In the Warehouse field, type ’24’ for this example. This warehouse is enabled for transportation management and advanced warehouse management.
- Select Save.
- Close the page.
Create a new load
- Go to the Navigation pane > Modules > Transportation management > Planning > Load planning workbench.
- Select the Sales lines tab. Now you’ll build the load for the sales order that you just created. Loads can be built based on supply and demand from purchase orders, transfer orders, and sales orders.
- On the Action Pane, select Supply and demand.
- Select To new load.
- In the Load template ID field, select the drop-down button to open the lookup. The Load template defines maximum measurements for weight and volume of the entire load. For example, the load template might represent the size of a container or truck. Select an item.
- Select OK.
Rate and route the load
- Select Rating and routing.
- Select Rate route workbench.
- Select Rate shop.
- In the list, find and select the desired record.
- Select Assign.
- Close the page.
Next Steps
If you are interested in learning more about how Microsoft Dynamics 365 for Supply Chain Management can help plan your shipping loads, contact us here to find out how we can help you grow your business. You can also email us at info@loganconsulting.com or call (312) 345-8817.
Related Posts
-
Posted on: July 23, 2026
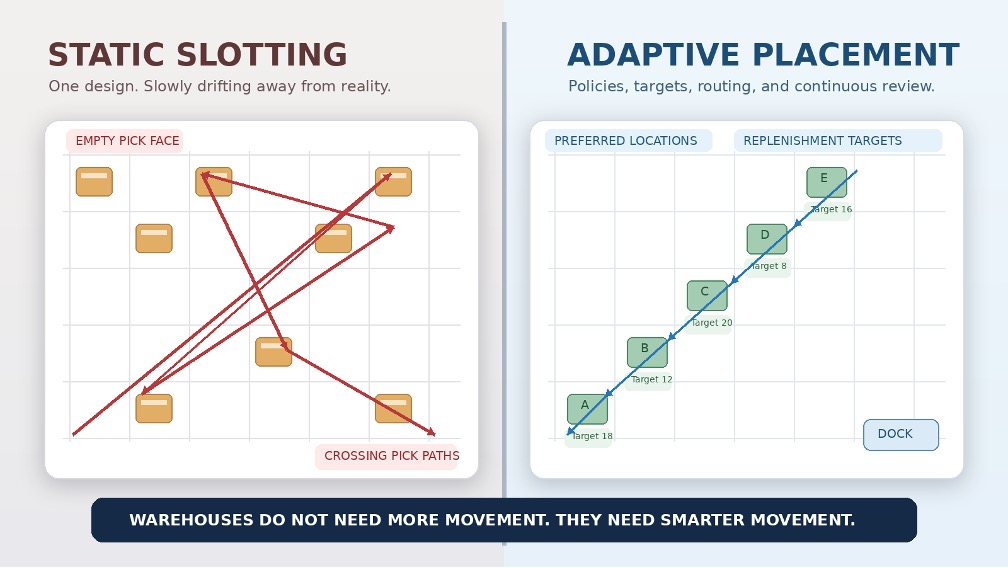
Figure 1. Static placement preserves yesterday's assumptions; adaptive placement governs today's movement. The position: The annual slotting project is no...
Read More ›
-
Posted on: July 21, 2026
Is Your Dynamics 365 Environment Ready? The next manufacturing advantage will not come from owning more AI. It will come...
Read More ›