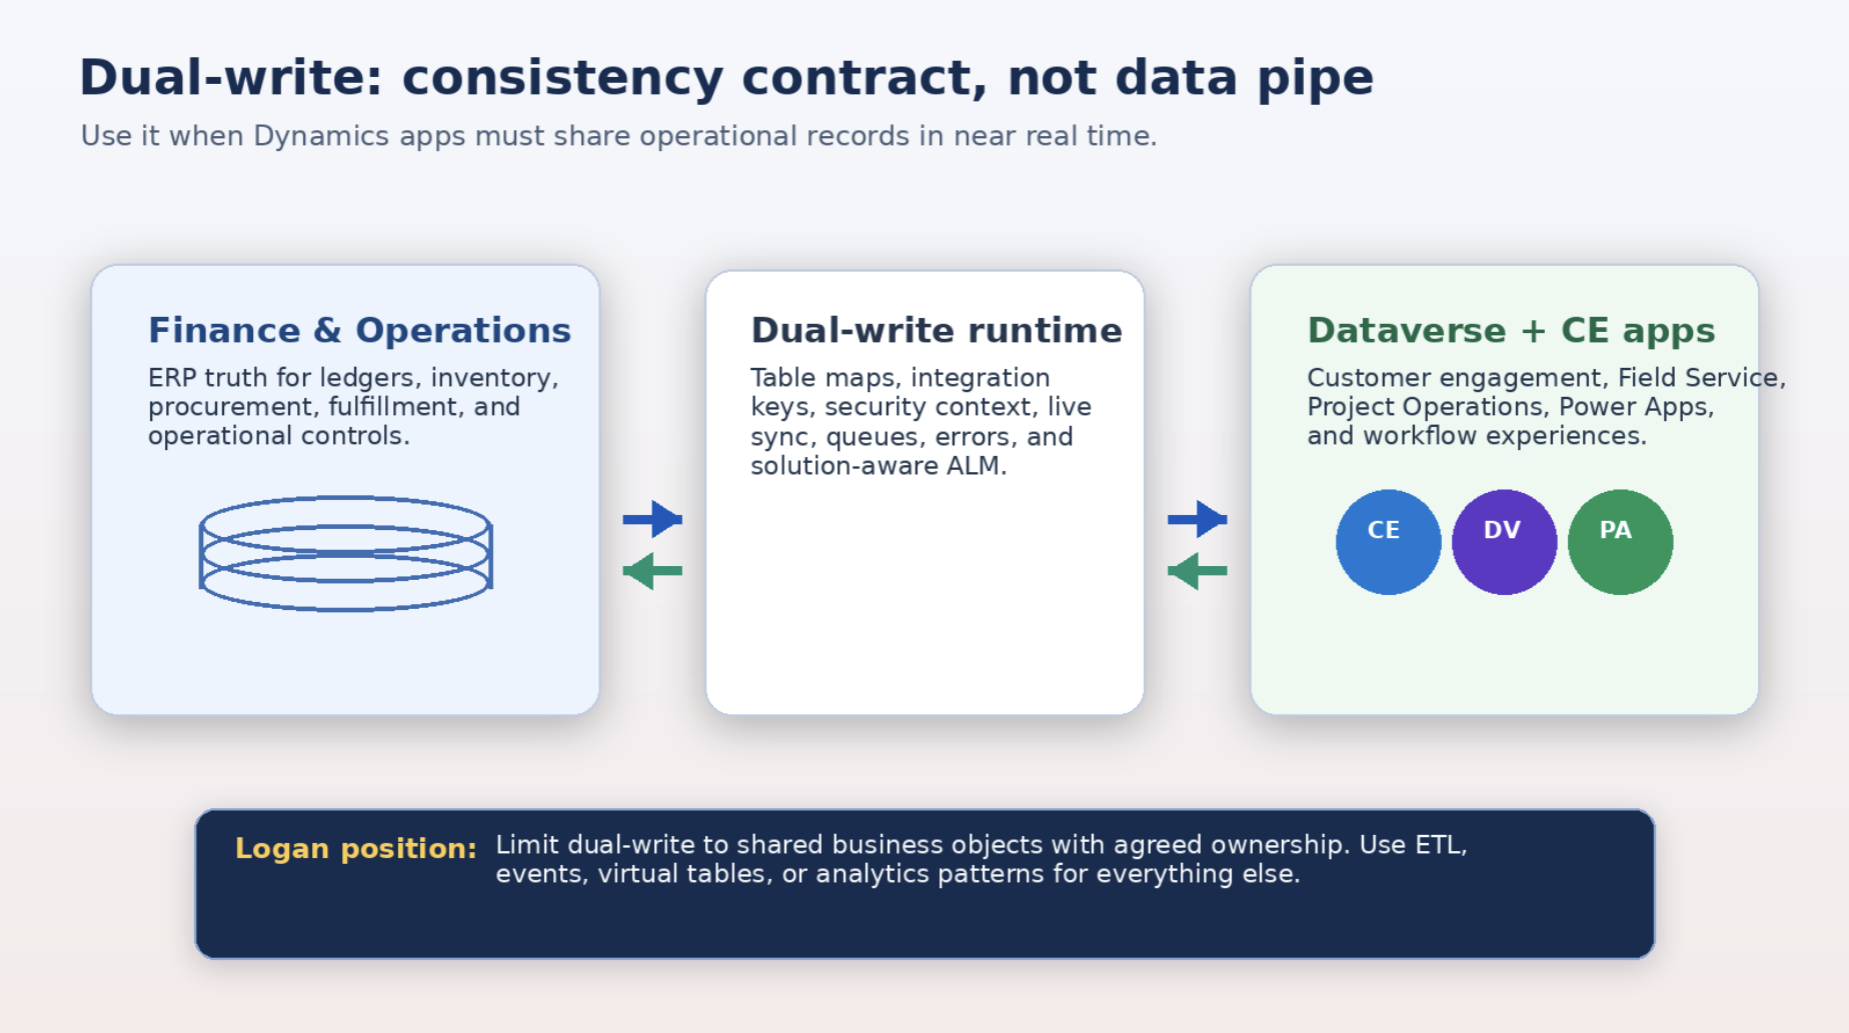


Reviews and corrects ledger-to-subledger alignment in D365 by fixing posting configurations, inventory profiles, reconciliation logic, GL mapping, and critical reporting procedures.
Dynamics 365 for Finance and Operations: Recurring Integration Manager for File Uploads
Posted on: February 16, 2018 | By: Jarrod Kraemer | Microsoft Dynamics AX/365
By Craig Leska Sr. Technical Consultant
File integration into Microsoft Dynamics 365 for Finance and Operations is really a great feature to import your journals, sales orders, purchase orders, etc. using a file upload process through the Data management entity with very little technical knowledge.
I will walk through the steps required to set up and configure Microsoft’s Recurring Integration Manager previously known as QuartzAX File Manager with Dynamics 365.
A few things before we start. You will need access to the Azure Portal and you will need to have a working data management import project set up, configured and working through a manual import. The Integration Manager basically works with the Data Management entities to import the files on the backend in an automated fashion.
You can download the Recurring Integration Manager software from github at the following link. The documentation can be found on the wiki page. The integration manager is at version 1.0.1 as of this writing.
We have the option to install the Scheduler App, Scheduler Service or a Full Install which installs both. We will choose Full Install for this walkthrough. Once installed we will go into Azure Portal and carry out a few steps. You may need to work with your Azure Systems Administrator for this.
Open Azure and select the Azure Active Directory item now select App registrations.
Register a new application for the Integration Manager. This application will be used for the Integration Manager’s use.

Open the application and note the following:
Application ID and Object ID as in the screenshot below.
· Application ID
· b93eb0e1-fb46-4325-****-************
· Object ID
· a95406eb-bf4c-486e-****-************

Next, you will also need to set a secret key.
In Azure Active Directory for the registered app click on Setting and then under API Access, click on Keys.
Enter a new key, I called mine Secret with a duration of never expires. Use what works best for your organization’s requirements.
Now the important part. Click SAVE and note the value. Once you close this page you cannot see this value again. Be sure the entire string is copied.

Now in D365, we will to navigate into Systems administration / Setup / Azure Active Directory applications. Click NEW and then paste the Client ID in with an identifier name such as ‘Integration Manager’ and a user to execute this. I used Admin in my example. The client ID can be found from the Azure Active Directory/ Application ID we copied earlier.

Next, we go into D365 Data Management entity and configure the project. I am using a simple GL Journal Upload job.
Open your import project and click on the ‘MANAGE’ tab then click on ‘Manage recurring data jobs.’

Enter the Application ID you copied earlier under the Manage authorization policy then click NEW, the ID will auto populate and enter a logical name along with setting the recurrence on both the processing and monitoring. Make sure the application ID is enabled along with the data job.

Now, we can start configuring our Recurring Integrations Scheduler. In the scheduler click Parameters, in the Dynamics 365 for Finance and Operations instances click Add.

Enter a logical name as the friendly name, enter the URL, enter the Auth endpoint and your Tenant value.

Next click on Add in the Azure AD applications section and enter the following Friendly name, Client ID, Client secret and Authentication type of Service. The client ID is the AAD application ID we copied earlier as is the client secret.

We will now validate these settings by selecting the Dynamics 365 instance and then clicking on the Validate image, selecting the ‘Service authentication’ option along with the AAD client App of our service.

We can now set up our Data job by selecting ‘Add’ and then entering a friendly name with the Activity ID, which can be found on the Manage schedule data jobs area, see image 6 from above. Select Upload as the Data type job.

The entity name can be found on the data job.

We can close out of the parameters and start to work on the schedule. Click on the Connect to service on the top menu and then on the bottom click Add job / Add upload job. By entering a path on the Top upload folder, the subfolders will get created automatically.
I like to specify the file type I am importing in the search pattern, this data import uses excel file types, you can also specify *.* as the default. Select your instance data job and service auth as parameters. Select add monitoring job. I also set the M to 01 for every minute under the Process monitoring job and Recurrence options.

When done click Add to schedule to save and close.
The final step is to drop the import file into the Input directory and it will automatically get processed at the scheduled time and moved into the UploadSuccess folder. On Process monitoring job schedule the import will get processed and moved into the Processing Success folder if there are no errors (the times are set to 1 minute in the above image). As you look in D365 you can view the status and another look in the journal you can see it there.

If you want to use this feature or have any questions in its use, do not hesitate in contacting us. We are more than happy to help you.
For additional information please feel free to reach out to us at info@loganconsulting.com or (312) 345-8817.
All the best!
Logan Consulting
www.loganconsulting.com


