


Reviews and corrects ledger-to-subledger alignment in D365 by fixing posting configurations, inventory profiles, reconciliation logic, GL mapping, and critical reporting procedures.
Customer Return Overview in Dynamics 365 for Finance and Operations: Part 1
Posted on: March 22, 2019 | By: Jarrod Kraemer | Microsoft Dynamics AX/365
Authored by: Kevin Gallagher
Overview
Processing customer return orders in D365 is a bit of a cumbersome process, but by the end of this blog, you should be able to wrap your head around the basic return process. To fully process a return order, there are two separate orders that need to be handled in the system. The first is the return order (also called an RMA), which is an order that behaves like a negative sales order and is used to process the physical receipt of the returned items. The second portion of the equation is the returned sales order, which is essentially a standard D365 Sales Order that allows for negative quantities. The Returned Sales Order is required to process the customer credit that may be required depending on the outcome of the Return Order.
Return Order
A customer return must always begin with a manually created return order. Unfortunately, D365 does not support creation of a return order directly from the original sales order. In simple terms, this return order is used to handle the physical return of goods. When a user creates a return order, the credit portion of a return, the Returned Sales Order, is created automatically. While the Returned Sales Order is automatically created, it is not easily visible in the system until the material is returned or we decide a credit should be issued without the material being returned.
Getting Started
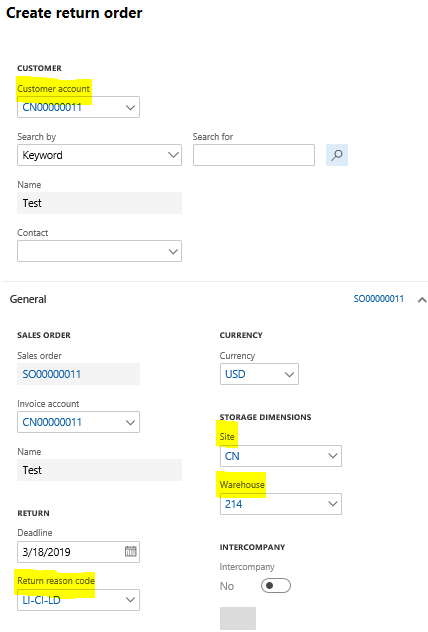
To create a return order, we can navigate to Sales and Marketing>All Sales Orders>Return Orders. Next, the user fills out some basic details like the customer, return reason code, and return site/warehouse. The only required field is the ‘Customer Account’, however any details entered on this screen carry over to the Return Order header and lines and allow us to complete the order efficiently.
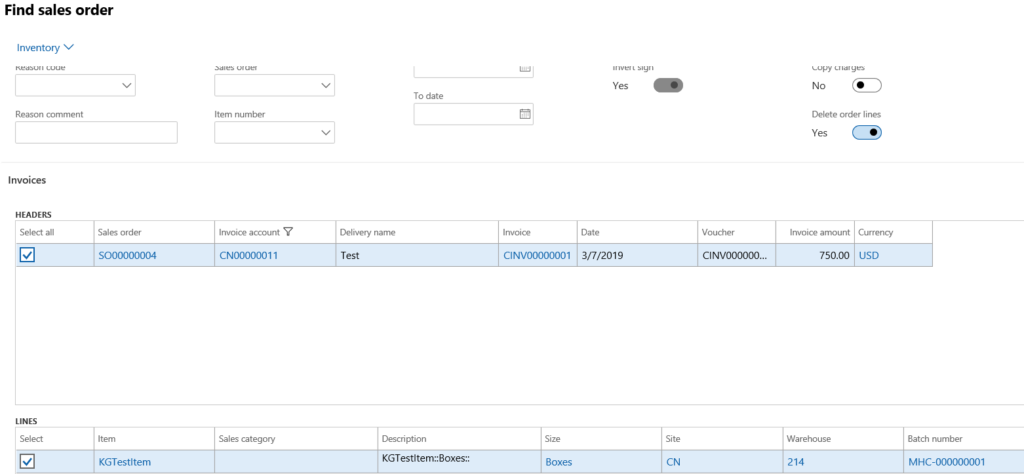
After getting the return order started, the user has the option to pull in the details of the existing sales order that the customer wants to return. This is done using the ‘Find Sales Order’ button in the Return Order tab. In this screen, the user selects the sales order to be returned, and has the option to return one, some or all the lines on the original sales order.
After pulling in all these details from the original sales order, we have a multitude of options to continue the return, depending on the scenario at hand.
- Credit the customer without the material being returned.
- This is a simple scenario that allows us to bypass the return of physical material, and continue on to credit the customer.
- Actions necessary – Set the ‘Disposition code’ to a code that has an action of ‘Credit only’

- This action sets the return status on the Return Order line to ‘Received’ and the header status to ‘Open’.
- After assigning this disposition code, the credit portion of the return, called the Returned Sales Order, will be available to process the customer credit.
- This process will be explained in a subsequent part of this blog series.
- Create a Replacement Order
- This functionality allows us to create a sales order with the exact details from the return order.
- This Replacement Order is simply a sales order that is related to the return order, but it allows us to easily track the two orders and take appropriate action.
- Send the Return Order to the customer and schedule the physical return of goods.
- Similar to a Sales Order confirmation, we can send a verification of order details to a customer by selecting the ‘Send Return Order’ button under the Return order tab.
- Once the customer confirms the return, and the material is returned to our site/warehouse, we can begin the material disposition process.
- Depending on the scenario, there are a variety of ‘Disposition actions’ we can choose to handle the material and subsequent credit (or lack thereof).
- Disposition actions:
- Credit Only – Described above, if we are Registering the material, this action will not be available
- Credit – This action will receive the returned items into inventory (where they will be available for sale), and will allow the credit to be issued (using the Returned Sales Order).
- Scrap – In short, this action will remove the returned items from inventory, and allow for credit issuance.
- Replace and Credit – Same as ‘Credit’ except the system will automatically create a new sales order (type = Replacement Order) with the details from the return order.
- Replace and Scrap – Same as ‘Scrap’ except the system will automatically create a new sales order (type = Replacement Order) with the details from the return order.
- Return to Customer – This action will remove the returned items from inventory but will NOT issue a credit. It is used when we determine that the return should not be processed, and no credit should be given.
- This could be used when the customer returns damaged material, or we determine a credit should not be issued for whatever reason.
- Disposition actions:
- The Disposition is done as part of the Registration process shown below.
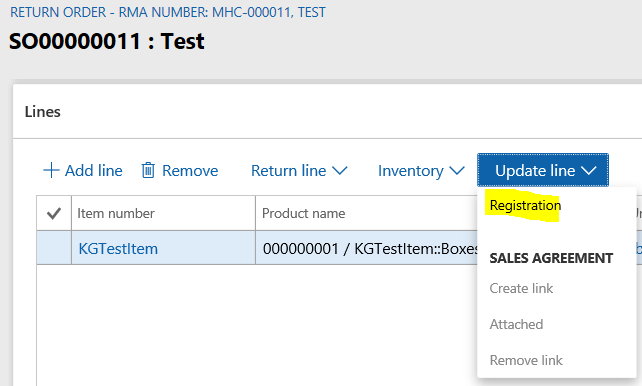
- Select the line being received, click ‘Update
line’, then ‘Registration’
- Choose the appropriate disposition as described above.
- From this screen, we can perform a variety of
actions:
- Split the line – If only a portion of the return line was returned, we can specify that only this quantity is received.
- Change
the batch disposition code – The returned material will receive the default
batch disposition code your company uses, but this code can be changed if
necessary.
- This is useful if we want to receive the returned material into inventory, but do not want to make the inventory available for sale prior to a full inspection.
- Add
registration line – This action allows us to continue the process of receiving
material into inventory.
- Select ‘Add registration line’
- Confirm the details of the material being returned.
- Select ‘Confirm Registration’
- At this point, the material has been received into inventory (Return order line status of ‘Received), and the Returned Sales Order is available to process the credit to the customer.
Conclusion
In this blog, we covered the first half of the Return Order process. We started with creating the Return Order and finished with Registering the returned material and assigning a disposition code. In the next part of this blog series, we will discuss how and when a credit can be issued, and the vehicle that is used to do so. Until then, thanks for reading and have a great day!
For additional information please feel free to reach out to us at info@loganconsulting.com or (312) 345-8817.
All the best!
Logan Consulting
www.loganconsulting.com


