


Reviews and corrects ledger-to-subledger alignment in D365 by fixing posting configurations, inventory profiles, reconciliation logic, GL mapping, and critical reporting procedures.
How To Use the Navigation Pane in Microsoft Dynamics GP Like a Pro
Posted on: August 17, 2020 | By: Guy Logan | Microsoft Dynamics GP
Whether you’re a new or experienced user, navigating Microsoft Dynamics GP can be confusing, especially if you’re unfamiliar with technology. That’s why we recommend using the Navigation Pane to our clients. The Navigation Pane is a quick and easy tool that can allow you to move through Dynamics GP without having to use their various menus. In this blog post, we’ll be discussing the four key tips you should know to use the Navigation Pane to your best advantage.

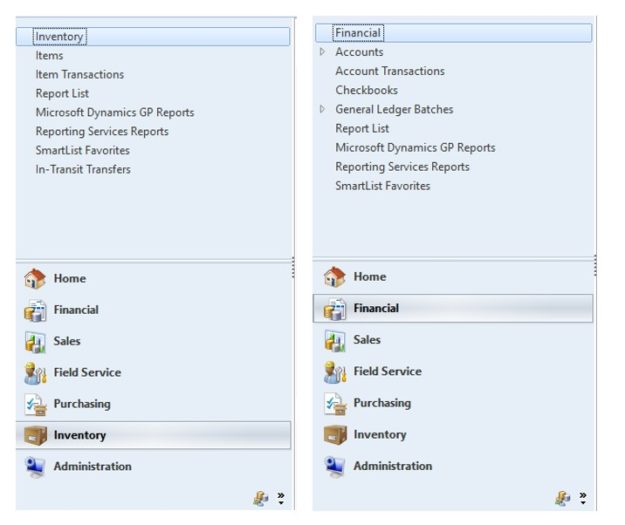
Tip #1: Creating a Custom Module List
The Navigation Pane comes with some amazing features. One of these features is the ability to customize the Navigation Pane for each user. By doing this, you can make it easy for users to move from one window to another or quickly access the modules they use the most.
To modify your Navigation Pane:
- Expand the Navigation Pane Options window by clicking the Configure button and then Navigation Pane Options (Configure > Navigation Pane Options).
- In the Navigation Pane Options window, unmark the modules you don’t need and mark any modules you want to add.
- Use the Move Up and Move Down buttons to order the modules as needed.
- Click OK to save your changes.

Tip #2: Creating a Custom Navigation List
When you select a module from the list, the Actions section changes to match the module selected. Then, you see the actions you can perform from the list. For example, if you click the Inventory module, you will see Items, Item Transactions, Reports, and more. Click on any of these Actions and Dynamics GP will redisplay a list of data specific to what you selected.
Create a New Custom List
You can also create a custom new list for your Navigation Pane. For this example, we’ll be finding unposted transactions in Dynamics GP for monthly or annual processes.
First, we’ll be creating a new action list that is specific to the records you are trying to return.
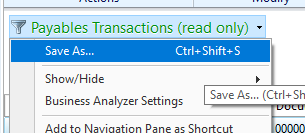
- From the Navigation Pane, select Purchasing and then select Payables Transactions from your Actions list (Navigation Pane > Purchasing > Actions > Payables Transactions).
- From the list title, click the drop-down and select Save As.
- Then, enter the name ‘Payables Transactions – Unposted’ and click OK.
Add the Status Column
We want to see transactions that have not been posted. That means those transactions will be in a Work status. By default, the Status column is not in the list, so we will need to add it.
- Click on the new list and wait for the records to populate.
- From the Payables Transaction – Unposted list, click the drop-down and select Customize.
- In the List View Customization window, click the expansion arrow next to Columns.
- In the Column Details window, mark the Status check box and then click OK.
- Back in the List View Customization window, be sure to click Save.

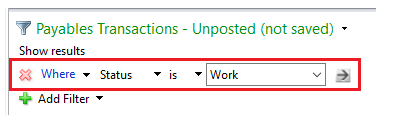
Create a Restriction
We want to see only the records that have a Work status. To do this, we’ll need to restrict the records to only records with that status.
- In the Payables Transactions – Unposted list, click Add Filter.
- Make the necessary selections to create the filter so that it matches the image below.
- Apply the filter by clicking the arrow pointing right to refresh the records.
After you add any other columns or filters, save the list so you can use it again in the future. To do this, just click the drop-down from the list title and select Save.
Tip #3: Creating a Shortcut
If you want to add an Action List to the Navigation Pane Home screen, there are two ways to do this.
From the List
In this example, we are adding the list we created above to the Home screen.
- Select Purchasing from the list.
- In the Purchasing Actions list, right-click on Payables Transactions – Unposted (Purchasing > Purchasing Actions > Payables Transactions – Unposted).
- Click Add to Shortcuts.
- From the Module list, click the Home button.
Now you’ll be able to see that Payables Transactions – Unposted has been added to the list.
From the Window
In this example, we’ll be adding the Customer Maintenance window to the Home list.
- First, go to Cards, then Sales, and then Customer (Cards > Sales > Customers).
- From the ribbon, click File and then click Add to Shortcuts.
- From the Module list, click the Home button.
Now, you’ll see that Customer Maintenance has been added to the list.
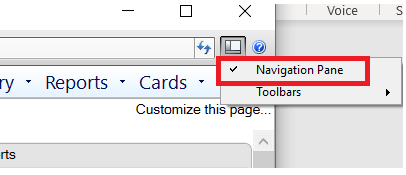
Tip #4: Hiding the Navigation Pane
You can also completely hide the Navigation Pane for times when you don’t want or need to see it. You can do this by clicking the Layout button and unmarking the Navigation Pane option. To add the Navigation Pane back, repeat the same steps and mark it to add the check mark back.
Next Steps
The Navigation Pane is an incredible tool in Microsoft Dynamics GP that adds efficiency to your work every day. Logan Consulting, a Microsoft Dynamics partner, has helped clients across the nation utilize the power of these tools to become more efficient. To start using the other tools available in Microsoft Dynamics GP, reach out to us to receive a free consultation.


