How to Process Interest with Microsoft Dynamics 365 Finance
Posted on: May 3, 2023 | By: Guy Logan | Microsoft Dynamics AX/365, Microsoft Dynamics Manufacturing
As businesses manage their credit and collections processes, calculating and posting interest on overdue transactions can be difficult. However, Microsoft Dynamics 365 Finance can help simplify this process. In this blog post, we will explore how Dynamics 365 Finance can help organizations streamline the creation, printing, and posting of interest notes, using the Contoso USMF demo company as an example.

This procedure shows how to create, print, and post interest notes. This task uses the Contoso USMF demo company.
Set up interest on the posting profile
- Go to Credit and collections > Setup > Customer posting profiles.
- Click Edit.
- In the Setup FastTab, in the Interest code field, select an interest code from the drop-down list. If you don’t want interest calculated for transactions using this posting profile, leave the field blank. The Table restriction FastTab allows you to change the way that interest is processed. If this field is set to Yes, then interest will be calculated for this posting profile.
Calculate interest
- Go to Credit and collections > Interest > Create interest notes.
- You must select the transaction types for which you will calculate interest. All of the open transactions for these types will be included in the calculation.
- If you set Interest to Yes, you will calculate interest on interest. You may want to check the laws governing the calculation of interest on interest before including these transactions.
- In the From date field, enter a date from which the interest will be calculated. If you don’t specific a From date, then all unposted interest notes will be canceled and interest will be recalculated from the transaction date.
- In the To date field, enter a date to which the interest would be calculated.
- In the Use posting profile from field, select an option. There are three posting profile options:
- Account – Use the posting profile that is assigned to the customer account for each interest note.
- Select – Use the posting profile that you select in the Posting profile field.
- Transaction – Use the individual posting profile from transactions on which interest is calculated for each interest note. Transactions that don’t have an assigned posting profile will use the posting profile that is specified in the Ledger and sales tax area of the Accounts receivable parameters page.
- Expand the Records to include FastTab.
- Click Filter.
- In the Criteria field, enter a Customer ID. For example, enter ‘US-001’.
- Click OK.
- Click OK.
Print interest notes
- Go to Credit and collections > Interest > Review and process interest notes.
- In the Status field, select Created.
- In the Printed field, select Not printed.
- Click Print.
- Expand the Records to include FastTab.
- Click OK.
- Close the page.
Post the interest note
- Select an interest note that is ready to post (status is Created).
- Click Post.
- Enter the posting date for the interest note. Select Yes to create a general ledger transaction for each interest note. If you don’t select Yes, the interest on all interest notes to the customer is accumulated and posted to the general ledger in one transaction.
- Expand the Records to include FastTab.
- Click OK.
- In the Status field, select Posted.
Next Steps
If you are interested in learning more about how to process interest in Microsoft Dynamics 365 Finance, contact us here to find out how we can help you grow your business. You can also email us at info@loganconsulting.com or call (312) 345-8817.
Related Posts
-
Posted on: June 11, 2026
[embed]https://youtu.be/f8S_rP0a_ig?si=FvTrvIIrKlFKw2cO[/embed] The 2025 release wave 2 for Dynamics 365 Finance covers the new functionality Microsoft delivered to market between October...
Read More ›
-
Posted on: June 9, 2026
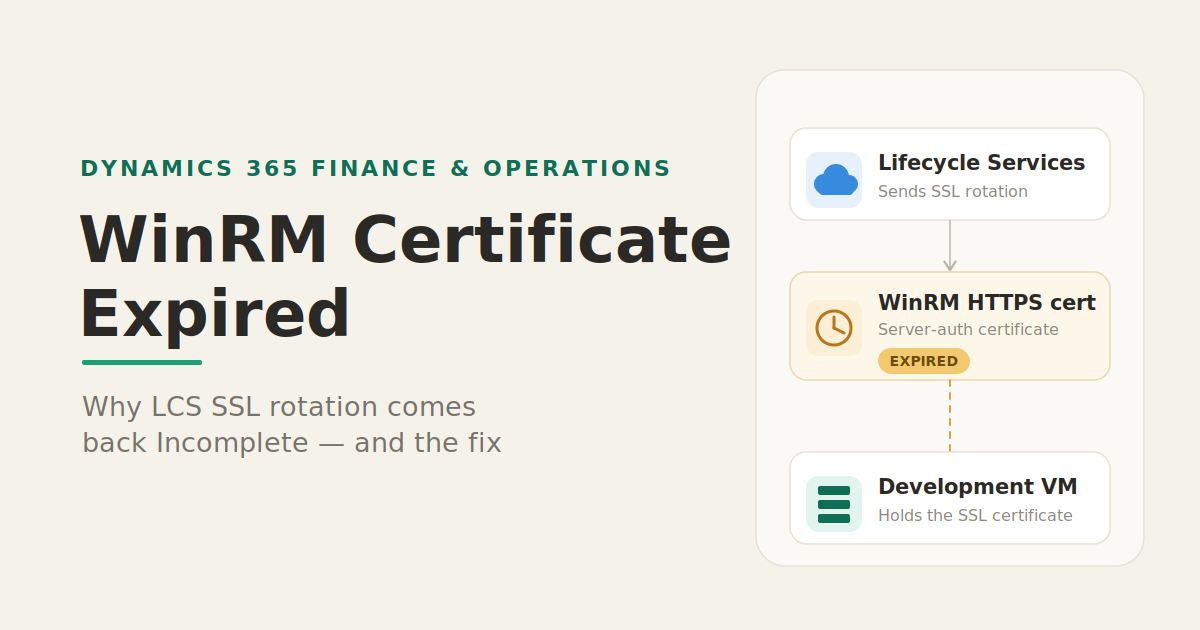
Every so often, a Dynamics 365 Finance & Operations development VM reminds us that certificates are like milk: they expire...
Read More ›