


Reviews and corrects ledger-to-subledger alignment in D365 by fixing posting configurations, inventory profiles, reconciliation logic, GL mapping, and critical reporting procedures.
Acumatica ERP – Setting up Recurring Transactions
Posted on: May 11, 2017 | By: Jim Bertler | Acumatica
Recurring Transactions in Acumatica allows for the automation of entering the same transactions on a regular basis. A schedule is created and added to a batch, or multiple batches, of journal transactions. The schedule defines when and how many times the batches in the schedule are processed.
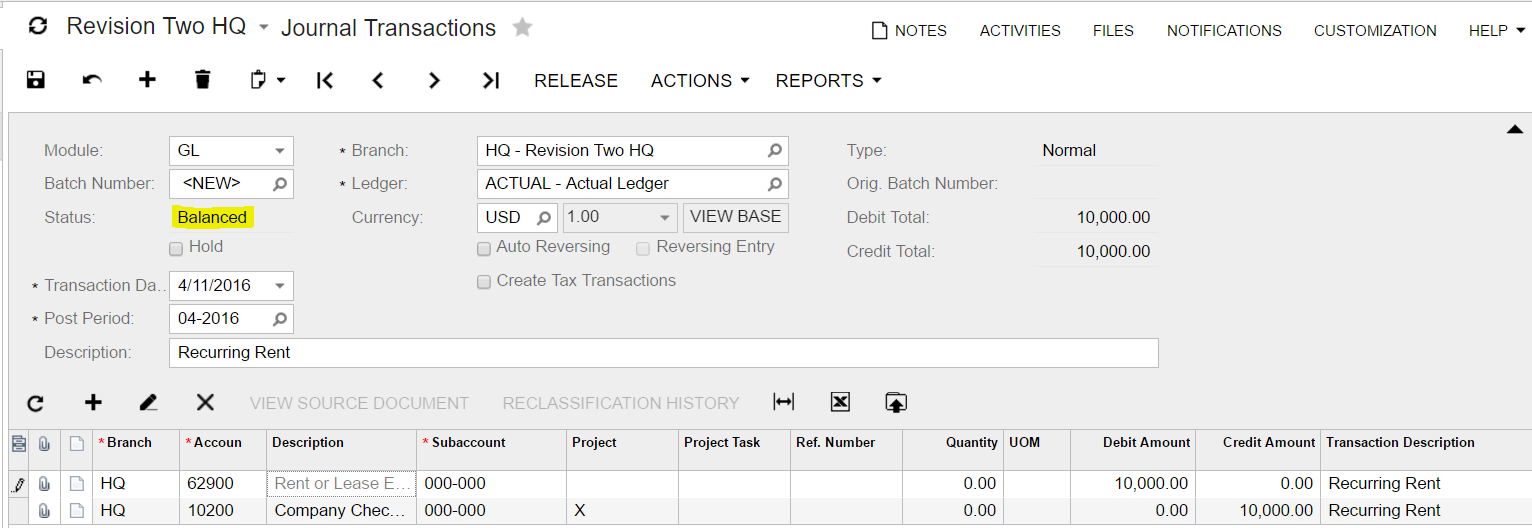
The first step to creating a Recurring Journal Transaction is to create a journal transaction with the status of ‘Balanced.’ Only batches with the status of ‘Balanced’ can be scheduled.
-
In the browser, navigate to ‘Finance → General Ledger → Work Area → Journal Transactions.’
-
Create a new journal transaction by clicking on the sign and entering the necessary information into the header of the transaction. Required fields in the header are marked with an asterisk *. An entry into the ‘Transaction Date’ field will automatically update the ‘Post Period’ field. Enter a description for the transaction.
-
At this point, you can either save the header information or you can move directly to entering the line information. To save the header prior to adding lines, click the ‘Save’ icon. To enter journal transaction lines without saving the header information, click on the sign in the lines section of the form. Complete the journal entry by adding lines to the transaction, filling in the values for the ‘Account,’ ‘Subaccount,’ and ‘Debit’ and ‘Credit’ amounts, ensuring the transaction nets to zero. Click the ‘Save’ button to save the transaction; the ‘Status’ should read ‘Balanced.’
-
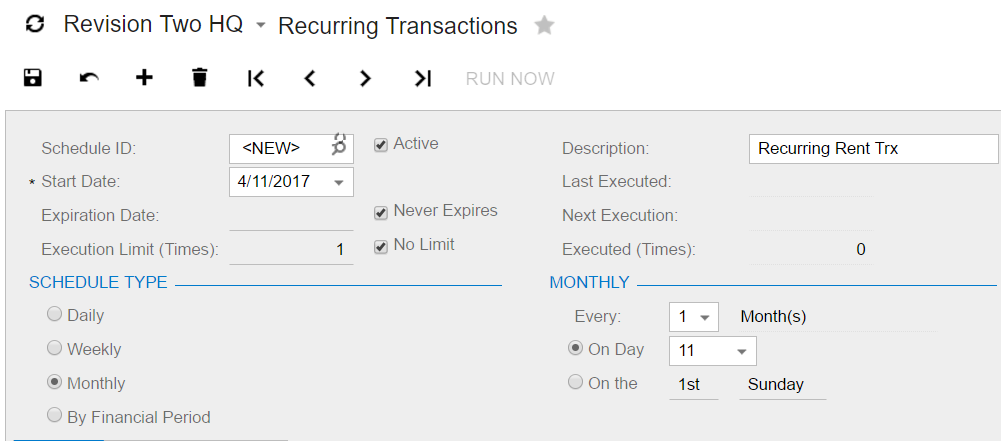
Now that the transaction has been entered and saved, the schedule can now be created that informs the system how often and when to create the transaction for subsequent posting. To create a new schedule or add this transaction to an existing schedule click ‘Actions → Add to Schedule.’ Selecting ‘Actions → Add to Schedule’ takes you to the ‘Recurring Transactions’ screen where schedules are created and maintained.
-
Schedule ID: The ID number of the schedule. The system automatically assigns the schedule ID.
-
Active: When this checkbox is checked, it means the schedule is active. When the checkbox is empty, the schedule cannot be used.
-
Start Date: The start date for the schedule.
-
Expiration Date: A date can be entered that indicates the date the schedule expires.
-
Never Expires: When this checkbox is checked, it means the schedule has no expiration date entered.
-
Execution Limit (times): The maximum number of times the schedule will be executed.
-
No Limit: When this checkbox is checked, it means the schedule will be executed into future financial periods.
-
Description: A description for the schedule.
-
Last Executed: A read-only field that displays the last date when batches attached to this schedule were generated.
-
Next Executed: A read-only field that displays the date that the schedule should be executed next based on the schedule parameters.
-
Executed (times): A read-only box that shows how many times the schedule has been executed.
-
Schedule Type: The frequency of batch generation.
-
Daily: The batches will be generated daily or every number of days.
-
Weekly: The batches will be generated once a week or every number of weeks.
-
Monthly: The batches will be generated once per month or every number of months.
-
By Financial Period: The batches will be generated once per financial period or every number of financial periods.
-
-
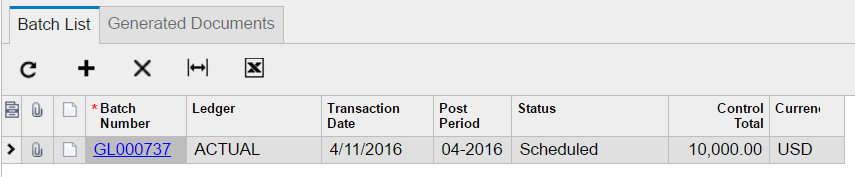
The ‘Batch List’ tab lists the batches that are assigned to the schedule. Each row displays the details of the selected batch. Multiple batches can be assigned to the same schedule and executing that schedule creates journal entries for each batch assigned.
-
The ‘Generated Documents’ tab contains the list of batches generated per the schedule. Once all the details for the schedule have been entered, press ‘Save’ to create the schedule with the current batch assigned to the schedule. The system will generate a ‘Schedule ID’ and the ‘Next Execution’ date will be filled in. To generate entries for batches attached to the schedule, click the ‘Run Now’ button in the header for the schedule. A green check mark denotes that the schedule ran successfully and has created the entries in the module. To post the entries, navigate to ‘General Ledger → Processes → Release Transactions.’ You will find your newly created, recurring transactions in the list.
-
Click the checkbox next to the batch number(s) that you wish to post and click the ‘Release’ button to post the transactions.

For more information on what Acumatica can do for your business contact Logan Consulting for your free consultation now!


