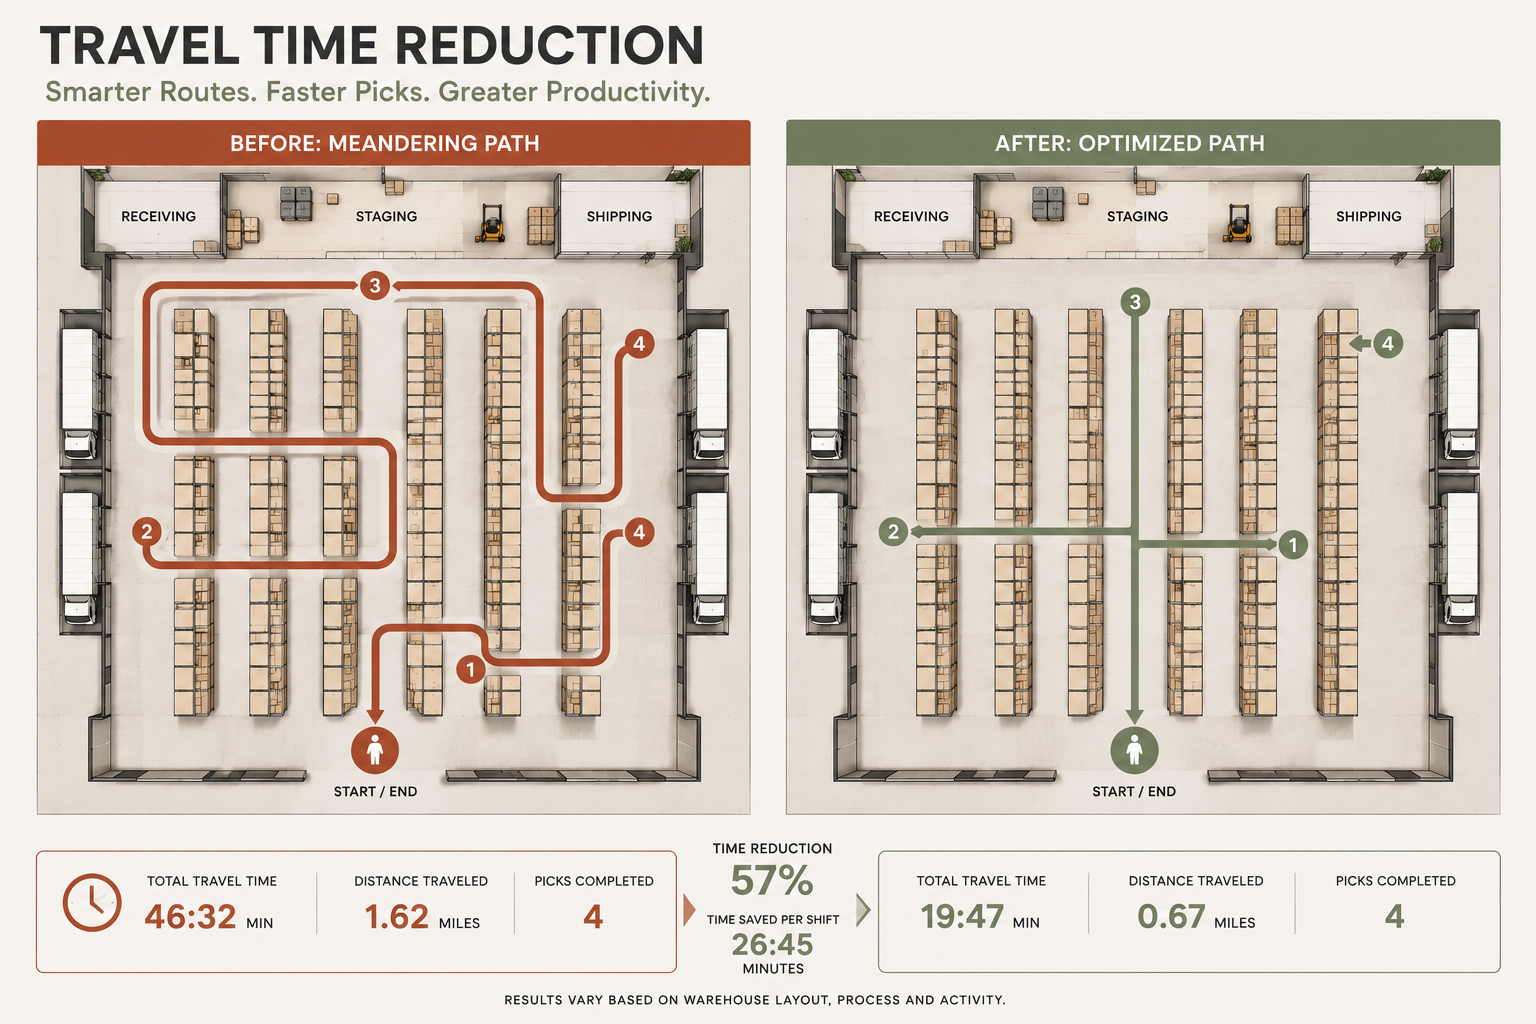
Seeing that it is already June, many of you are looking towards the warm weather and what the rest of the year has in store for you and your company. To motivate your sales team to generate new business, you may not need to look anywhere else other than this blog! Energize your business and incentivize your employees with new commission structures by utilizing out-of-the-box functionality in Microsoft Dynamics 365. The commission setup is flexible and allows for creativity so your company can get off to a hot start this summer.
There are several moving pieces that are eventually combined to complete what D365 calls the commission calculation. The initial steps will require us to complete the setup for the three bottom groups: Customer groups for commission, Item groups, and Sales groups. Let us start with customer groups for commission.
Commission Customer Groups
The commission customer group can be used to identify customers who should be included in the commission calculation. This form will determine how you categorize customers that your salesperson(s) can receive a commission on. The groups and their names are user-defined fields, so feel free to be as creative as you want when creating these groups.
- Navigate to Sales and marketing > Commissions > Customer groups for commissions.
 Select “New”.
- Give the group an ID and a name and click “Save”.
Now, you can assign this customer commission group. First, navigate to Sales and marketing > Customers > All customers. Then, assign it to the customers you want to include in the commission calculation.
- Find and select the desired record in the list.
- Click the link in the selected row.
- Select Edit.
- Expand the Sales order defaults section.
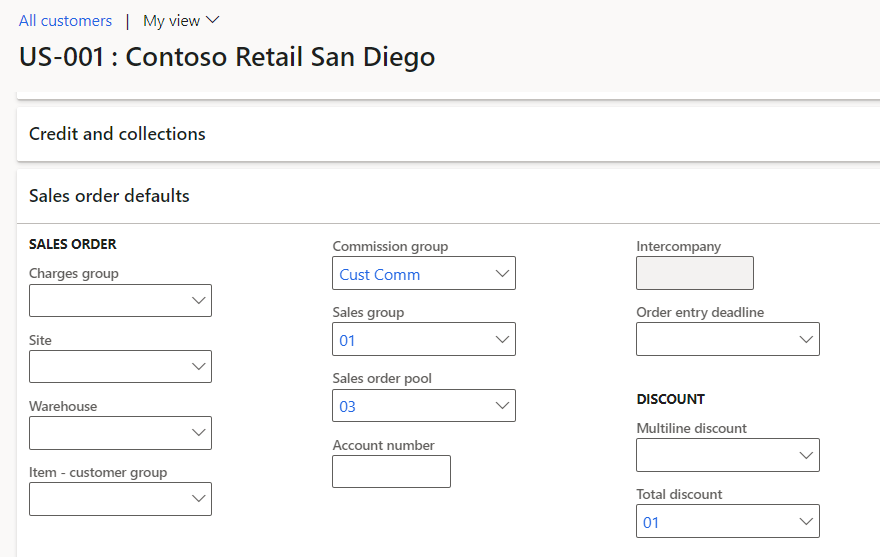
- In the Commission group field, click the drop-down button to open the lookup.
- Select the group that you created earlier in the list.
- In the Sales group field, click the drop-down button to open the lookup.
- In the list, find and select the desired record.
- Click Save.
- Go to Navigation pane > Modules > Product information management > Products > Released products.
- Use the Filter to find records. For example, filter on the Item number field with a value of ‘T0020 ‘.
- In the list, click the link in the selected row.
- Click Edit.
- Expand the Sell section.
- In the Commission group field, click the drop-down button to open the lookup.
- In the list, select the commission group that you created earlier.
- Select Save.
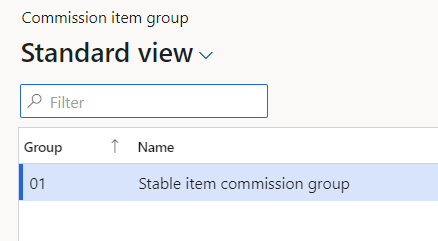
Create Commission Item Groups
Commission item groups are how you can identify the items that are eligible for commissions. To create a commission item group:
- Navigate to Sales and marketing > Commissions > Item groups.
- Click the “New” button and give the group an ID and a name.
Now, you can assign this commission item group to all the items that are eligible for this commission calculation.
- Navigate to Product information management > Products > Released products.
- Click the item ID hyperlink to open the item master.
- In the “Sell” fast tab in the “Commission group” field select the commission item group we created above.

Create Sales Groups
The sales groups are used in the commission calculation to determine which group of sales representatives the commission should go to. To create a commission sales group, navigate to Sales and marketing > Commissions > Sales groups.
- Click the “New” button to create a new group.
- Give the group an ID and a name and click save.

- In the “General” tab in the ribbon click the “Sales rep.” button.
- Click the “New” button to add a sales representative to the sales group.

- In the “Name” field select the representative.
- In the commission field, identify how the commission should be split.
- Navigate to Sales and marketing > customers > All customers.
- In the “Sales order defaults” fast tab of the customer master, select the sales group we created above.
Commission Calculation
We finally have all the necessary pieces set up and assigned to create a commission calculation.
- Go to Sales and marketing>Commissions>Commission calculation.
- Click the “New” button.

Using the previous three forms, you can create several different commission calculations. First, determine which item(s) you would like commission to be earned when that item(s) sells. The item code Table will let you select only one item, Group allows you to select an item group (which we just created), and All is obviously all items. In the customer code drop down, Table allows you to select an individual customer, Group allows you to select a commission custom group (previously created), and All is obviously all groups. For the Sales rep. code you can only select Group, or a commission sales group (previously created) or All, which would just be all sales rep. groups.
In the Commission based on section, you can determine how the commission is applied given the sales order, factoring in discounts, on revenue or on margin, and the percentage of commission received from a given sales order. Please note that this is a different form than the commission share in the commission sales groups. For example, if you had a 10% commission percentage on a sales order with revenue of $1,000, the commission would be $100. That $100 would be split based on the percentages defined by the commission sales group. So, if each sales rep. had a 20% share and there were five sales representatives, they would each earn $20.
To view this breakdown on a sales order, click the invoice tab on the specified sales order and then select Invoice Journals, which will open a new form. In that new form, select Commission and click Commission transactions.
In the Period section, you can make these calculations date sensitive so that they are only applied within a given period.
One last thing, do not forget to set up which ledger accounts these commissions will post to in Sales and marketing>Commissions>Commission posting. Be sure to choose the main account for both the commission and commission offset.

The commission functionality in D365 allows you to quickly and effectively motivate your salespersons to offer creative compensation. You can also drive sales to certain customers and items with this functionality.