In many business situations, an organization will find a need to add various expenses to purchase or sales orders. For example, your company may want to charge your customers for freight costs or processing fees associated with a sales order. The charges feature in Microsoft Dynamics 365 Supply Chain Management helps you automatically allocate charges to purchase orders or sales orders.
Automatic charges, or auto charges, are automatically applied when you create a sales order or a purchase order. You can define auto charges for specific vendors, customers, groups of vendors, or items. You can also define auto charges that apply to all vendors, customers, or items.
Set up Charge codes
To allocate charges, you must first define charge codes.
- Follow one of these steps:
- For purchase orders: Go to Accounts payable > Charges setup > Charges code.
- For sales orders: Go to Accounts receivable > Charges setup > Charges code.
- On the Action Pane, select New to create a charges code.
- In the header of the new record, set the following fields:
- Charges code – Enter a code for the charges.
- Description – Enter a description of the charges.
- Item sales tax group – Select an item sales tax group, if applicable.
- Prorate – Set this option to Yes if you want to prorate your charges. This option is available only for sales orders.
- Maximum amount – Enter the maximum amount that is allowed for the charges code. This field is used to validate charges for vendor invoices. It’s available only for purchase orders.

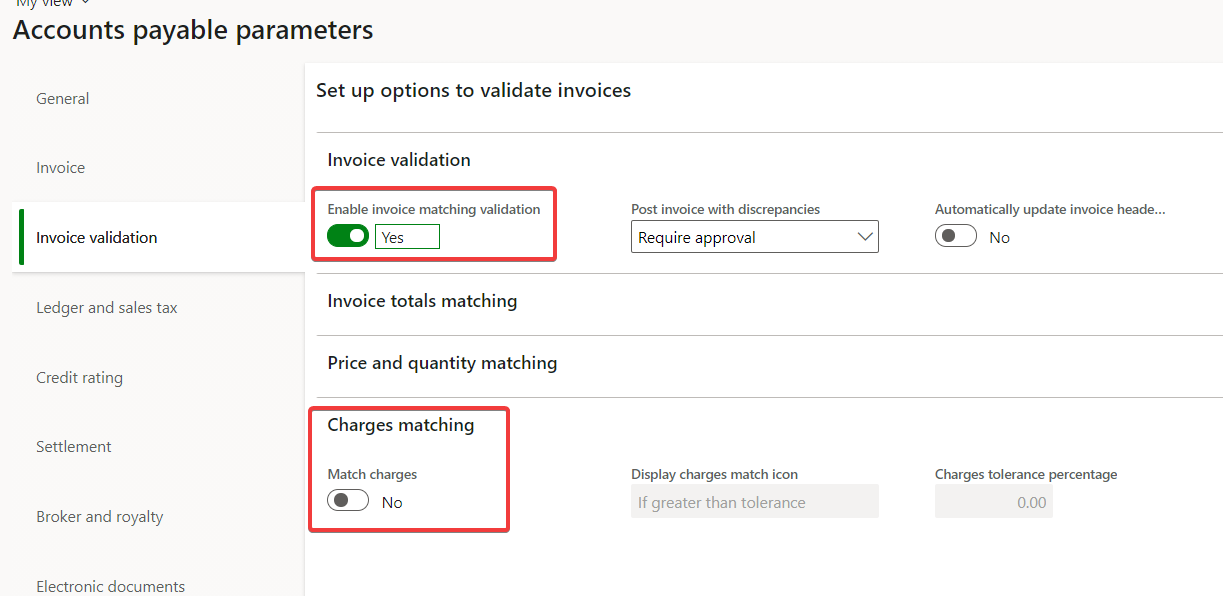
Note: To turn on the functionality for validating charges for purchase orders, go to Accounts payable > Setup > Accounts payable parameters. On the Invoice validation FastTab, in the Invoice validation section, set the Enable invoice matching validation option to Yes. If you want to match the charges from an invoice to a PO then the Match charges switch must be turned to Yes as well.
- The Posting FastTab includes Debit and Credit sections. Set the following fields, depending on the ledger that you want to post the charges to:
- Type – Select the type of account that you’re posting to (Ledger, Customer, or Item).
- Posting – Select the type of postings to create (such as Broker fee or Customer settlement).
- Account – Select the account to post the charge for.
- On the Action Pane, select Save.
Once charge codes are set up, they will be available to add to any purchase order, sales order, or free text invoice. The accounting for the charge (aka how to apply the charge – to a specific expense account or to the item) will flow through from the charge code setup.
Create Charges Groups
Charges groups automatically allocate specific charges to a group of customers or vendors. The following subsections describe how to create and assign these charges groups.
Charges groups for purchase orders:
To create charge groups for purchase orders, follow these steps.
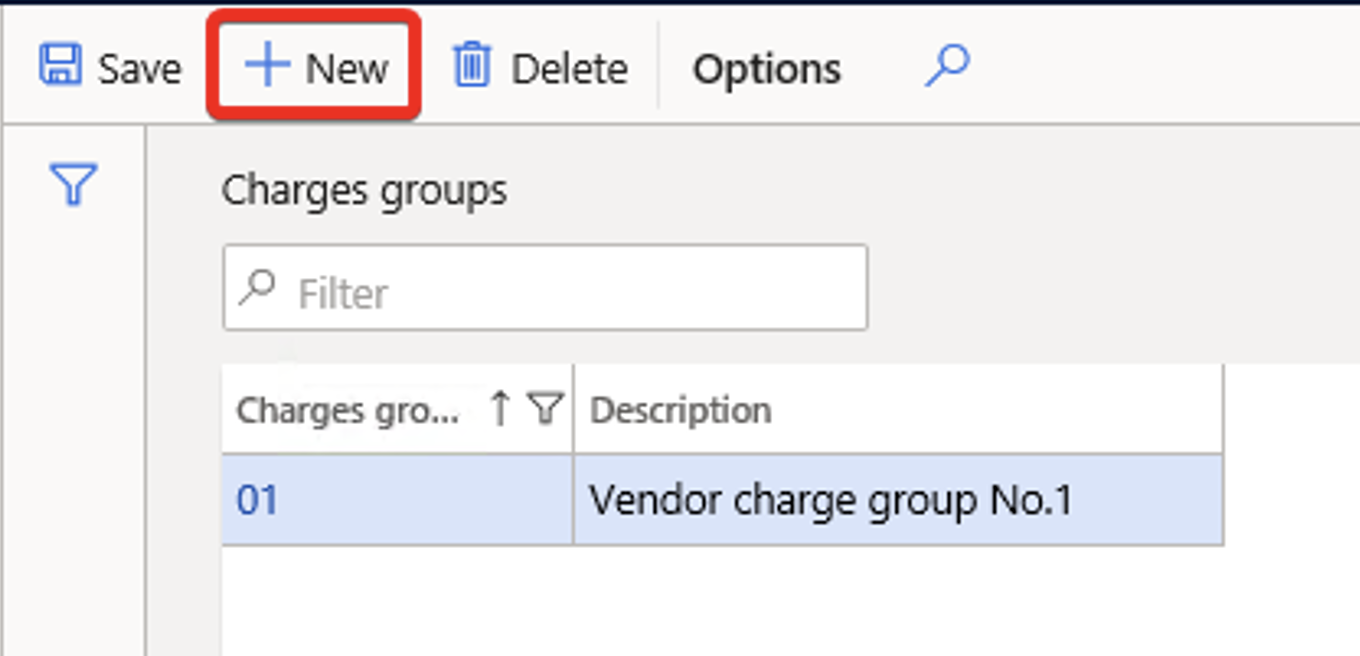
- Go to Accounts payable > Charges setup > Vendor charges group.
- On the Action Pane, select New to add a row to the grid, and then set the following fields:
- Charges group – Enter the name of the charge group.
- Description – Enter a description of the charge group.
- On the Action Pane, select Save.
- Go to Accounts payable > Vendors > All vendors, and either open an existing vendor or create a new vendor.
- On the Purchase order defaults FastTab, in the Purchase order section, set the Charges group field to the charge group that you just created.

Charges groups for sales orders:
To create charge groups for sales orders, follow these steps.
- Go to Accounts receivable > Charges setup > Customer charges groups.
- On the Action Pane, select New to add a row to the grid, and then set the following fields:
- Charges group – Enter the name of the charges group.
- Description – Enter a description of the charges group.
- On the Action Pane, select Save.

- Go to Accounts receivable > Customers > All customers, and either open an existing customer or create a new customer.
- On the Purchase order defaults FastTab, in the Sales order section, set the Charges group field to the charge group that you just created.

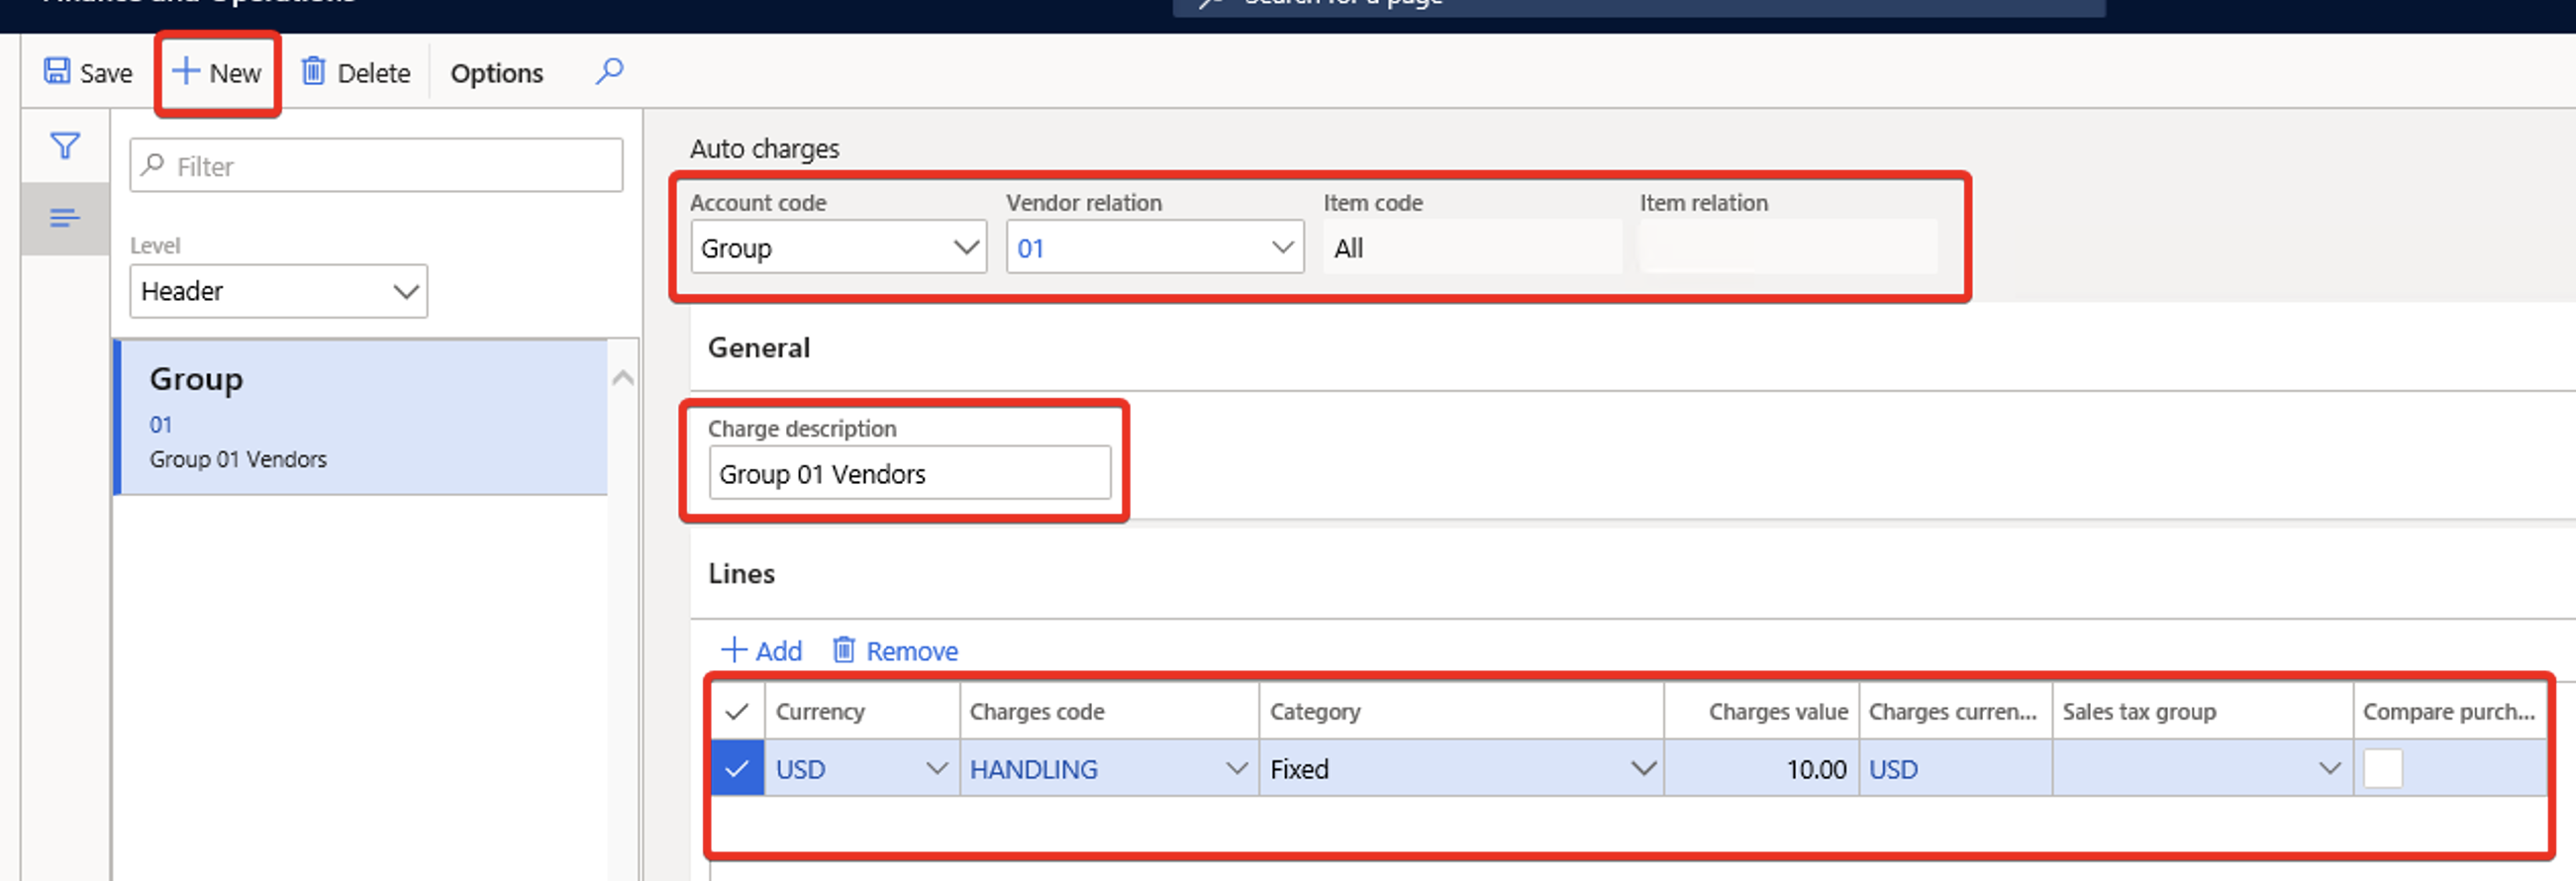
Define Auto Charges
After your charges codes are set up, follow these steps to define the auto charges.
- Follow one of these steps:
- For purchase orders: Go to Procurement and sourcing > Setup > Charges > Automatic charges.
- For sales orders: Go to Accounts receivable > Setup > Charges setup > Auto charges.
- In the list pane, in the Level field, select the level where your auto-charge applies:
- Main – Apply charges to the order header.
- Line – Apply charges to the order lines.
- Select an existing auto charge to edit it, or select New to define a new auto charge.
- In the Account code list, select one of the following values to specify the scope of accounts that will be affected:
- Table – Assign charges to a specific customer or vendor.
- Group – Assign charges to a miscellaneous charges group.
- All – Assign charges to all customers or vendors.
- In the Customer relation or Vendor relation field, select a specific customer or vendor if you set the Account code field to Table. If you set the Account code field to Group, select a customer or vendor charges group.
- In the Item code field, select one of the following values to specify the scope of items that will be affected. You can select an item code only when you define auto charges at the line level.
- Table – Assign charges to a specific item.
- Group – Assign charges to an item charges group.
- All – Assign charges to all items.
- In the Item relation field, select a specific item if you set the Item code field to Table. If you set the Item code field to Group, select an item charges group.
- For sales orders only: In the Mode of delivery code field, select one of the following values to specify the scope of delivery modes that will be affected:
- Table – Assign charges to a specific mode of delivery.
- Group – Assign charges to a mode of delivery group.
- All – Assign charges to all modes of delivery.
- For sales orders only: In the Mode of delivery relation field, select a specific mode of delivery if you set the Mode of delivery code field to Table. If you set the Mode of delivery code field to Group, select a mode of delivery group.
- On the Lines FastTab, define the charges and the charges rates that will be used when the current auto-charge is applied. You can use the toolbar on this FastTab to add as many lines as you require. For each line, set the following fields:
- Currency – Select the currency that should be used to calculate the charge.
- Charges code – Select the code for the charge.
- Category – Select one of the following values:
- Fixed – The charge is entered as a fixed amount on the line. Fixed charges can be used on charges both in the order header and on the order lines.
- Pcs – The charge is based on the unit. These charges can be used only on order lines. They will appear when you calculate the order total.
- Percent – The charge is entered as a percentage on the line. Percentage charges can be used on charges both in the order header and on the order lines.
- Intercompany percent – The charge is entered as a percentage on the line for intercompany orders. Intercompany percentage charges can be used only on order lines.
- External – The charge is calculated by a third-party service that is associated with one or more shipping carriers.
- Charges value – Enter the charge value, based on the category that you selected.
- Charges currency code – Specify a currency for the charge if you want to use a currency other than the currency that you specified in the Currency field. You can use a different currency only if the Debit type or Credit type field is set to either Ledger account or Item for the selected charges code.
- From amount – Specify a starting amount to apply the auto-charge to. In this context, the amount refers to the order total.
- To amount – Specify the ending amount to apply the auto-charge to. In this context, the amount refers to the order total.
- Sales tax group – Specify a sales tax group.
- Site and Warehouse – Specify a site and warehouse if charges should be applied only for a specific site and warehouse.
- Keep – Select this check box to keep the charges transactions after invoicing is completed so that the charge will be applied every time that you create a new invoice for the selected customer account.