


Reviews and corrects ledger-to-subledger alignment in D365 by fixing posting configurations, inventory profiles, reconciliation logic, GL mapping, and critical reporting procedures.
How to User Mass Modify in Dynamics GP
Posted on: September 19, 2016 | By: Guy Logan | Microsoft Dynamics GP
A very useful and powerful tool in Dynamics GP is called Mass Modify. This feature is very helpful if a user needs to copy a certain range of accounts to create a new range. For example, let's say a user needs to setup a new division in you chart of accounts. A user could accomplish this by setting each account up one-by-one. However, Mass Modify will set them all up at once.
How to Use Mass Modify
Navigate to Cards —> Financial —> Mass Modify. The first step in the process is to select the type of change you want to make. The options to choose from are Copy, Move, Inactivate, Delete, and Update. Then, select the origin for the description from either existing accounts or accounts segments. Next, enter the new department number in the Account Mask. A user can choose to sort the accounts in the scrolling window by account or by main segment. A user can also choose to display all accounts or just the selected range of accounts in this window.
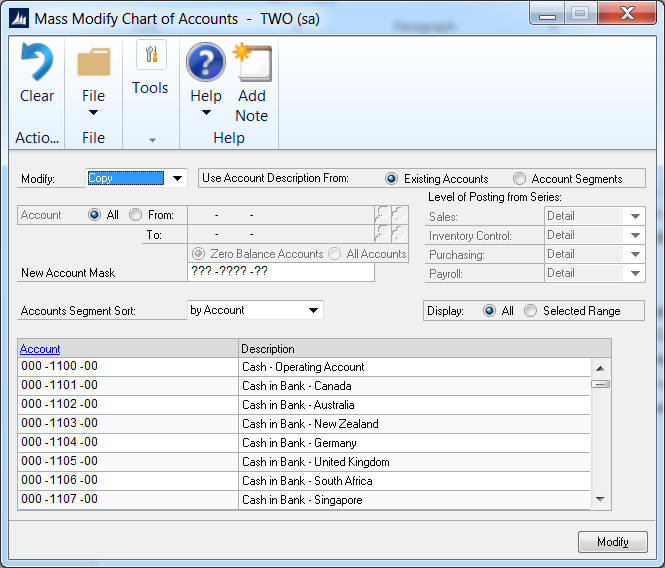
Once the above is finished, click Modify to complete the process. If there are any existing accounts that fall in the range that is being modified, a warning will pop up that duplicate accounts exist and given the option to copy these accounts or not. However, since GP doesn't permit duplicate account numbers, a user will have only one of each account after the copy process.
It is highly recommended that a backup is made before utilizing this tool. Remember to check your chart of accounts to make sure that all changes. If there are any mistakes, the backup can be restored and Mass Modify can be reattempted.
If you found this tutorial post to be helpful, click here for more of our Dynamics GP how to videos and posts. Think Dynamics GP may be the next best step for your business? Contact Logan Consulting, your chicago based Microsoft Partner for a consultation.


